Style / Item Creation and Editing
- STo start creating a new style in NetSuite:
- Go to the Financial drop down menu, located on the ribbon at the top of the NetSuite
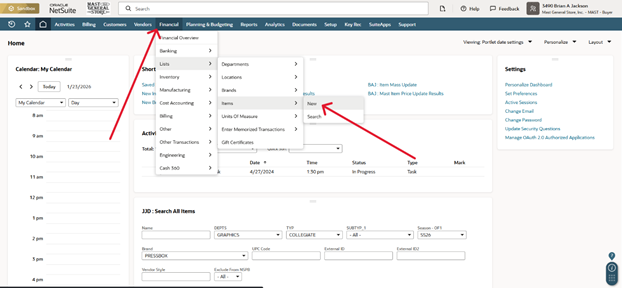
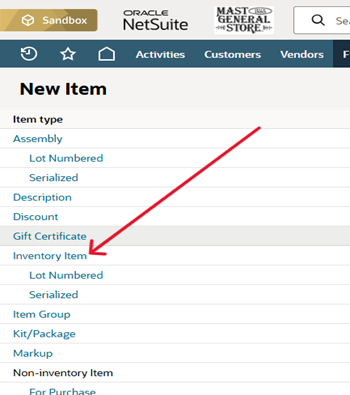
- You now are in the Style / Item creation screen
The first thing that needs to be determined before you start:
- Does this item have Attributes?
- Does this item need to be a Parent Item
- Parent Item = Base Style that all Child Styles with attributes, are linked to
- We will go over the process of creating Parent and Child Styles as we create a new item
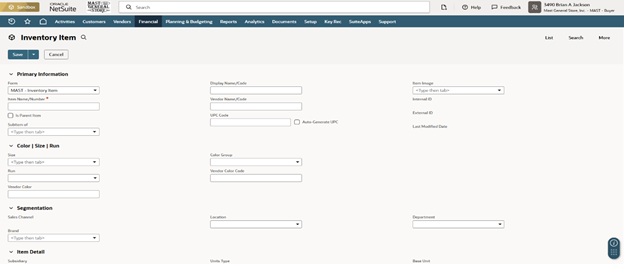
Starting from the top of the page, fields that will be filled in, when creating a style
- *Item Name/Number (REQUIRED)
- This is the Style # in Celerant
- Is Parent Item check box
- This will determine if the item is a Parent Style or not
- Display Name/Code (REQUIRED)
- This is Description 1 in Celerant
- UPC Code
- If this is a parent item, you do not have to enter anything here
- You can click the Auto-Generate UPC check box to automatically create a UPC for the item
- You can also manually enter in a UPC here
- Size
- This is where you will select the size of a Child Item
- NOTE: ONLY SELECT SIZE IF YOU ARE CREATING A CHILD STYLE
- PARENT STYLE/ITEM DO NOT NEED ATTRIBUTES
- This is where you will select the size of a Child Item
- Run
- This will be the second size attribute
- Used for pant sizes, etc.
- NOTE: ONLY SELECT RUN IF YOU ARE CREATING A CHILD STYLE
- PARENT STYLE/ITEM DO NOT NEED ATTRIBUTES
- Vendor Color
- Enter in the desired color attribute here
- NOTE: ONLY SELECT VENDOR COLOR IF YOU ARE CREATING A CHILD STYLE
- PARENT STYLE/ITEM DO NOT NEED ATTRIBUTES
- Vendor Color should have NO SPACES
- Replace spaces with UNDERSCORE ( _ )
- Ex) Heather Green = HTR_GREEN, Smokey Grey = SMOKEY_GREY
- Replace spaces with UNDERSCORE ( _ )
- Enter in the desired color attribute here
- Vendor Color Code
- Enter in the desired vendor color code here
- NOTE: ONLY SELECT VENDOR COLOR CODE IF YOU ARE CREATING A CHILD STYLE
- PARENT STYLE/ITEM DO NOT NEED ATTRIBUTES
- Ex) Color: Cherry Noir
- Vendor Color Code: CNR
- Enter in the desired vendor color code here
- Brand (REQUIRED)
- You will select the brand that is associated with the item here
- Unit Type (REQUIRED)
- Determine if the item will be scanned and inventory as individual items (EACH) or by weight (WEIGHT)
- Once you select either EACH or WEIGHT; Primary Stock Unit, Primary Purchase Unit, Primary Sale Unit, and Consumption Unit will fill in automatically
- Purchasing/Inventory
- Located toward the bottom of the screen, you will find a ribbon with options on it, this is the first option
Purchase Price
§ This is where you will enter the Cost of the Item
· NOTE: ONLY SELECT PURCHASE PRICE IF YOU ARE CREATING A CHILD STYLE
· PARENT STYLE/ITEM DO NOT NEED COST OR RETAIL
o Use Bins = Unchecked (Blank)
o Track Landed Cost = Checked (Check mark in box)
o Auto-Calculate Lead Time = Unchecked (Blank)
o Auto-Calculate Reorder Point = Unchecked (Blank)
o Auto-Calculate Preferred Stock Level = Unchecked (Blank)
o Vendor (REQUIRED)
§ Enter your Vendor associated with the item here
§ You will need to check the box for Preferred vendor (shown below)

· Merchandise Hierarchy
o Choose the hierarchy path that the item will be in (REQUIRED)
§ Ex) Graphics / Tshirts / Tees
§ Select Included in Version (See Below)

· Sales / Pricing
o Located toward the bottom of the screen, you will find a ribbon with options on it, this is the fourth option
o At the very bottom of the screen, you will find a matrix to enter your Retail Pricing in
§ Selling Price (Base Price)
· Enter your Retail Price here
§ First Price, Suggested Price should also be field in as well
§ Online Price
· This will fill automatically when you enter the Selling Price (Base Price)