Style / Item Creation and Editing
Creating a new style in NetSuite
- Go to the Financial drop down menu, located on the ribbon at the top of the NetSuite
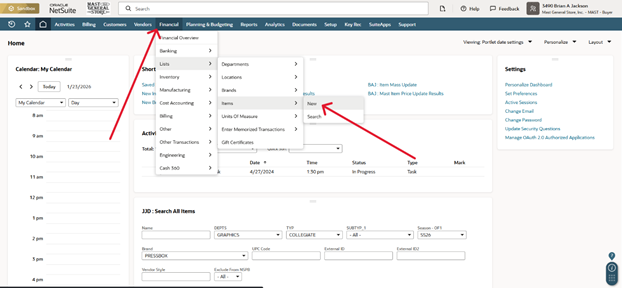
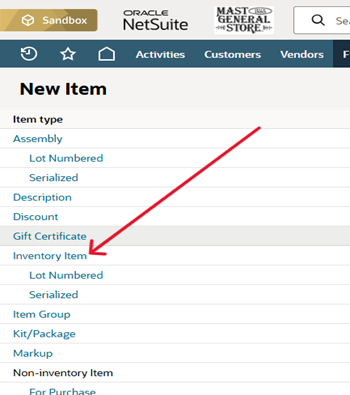
- You now are in the Style / Item creation screen
The first thing that needs to be determined before you start:
- Does this item have Attributes?
- Does this item need to be a Parent Item
- Parent Item = Base Style that all Child Styles with attributes, are linked to
- We will go over the process of creating Parent and Child Styles as we create a new item
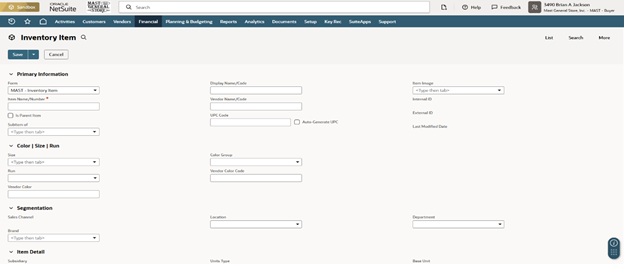
Starting from the top of the page, fields that will be filled in, when creating a style
- *Item Name/Number (REQUIRED)
- This is the Style # in Celerant
- Is Parent Item check box
- This will determine if the item is a Parent Style or not
- Display Name/Code (REQUIRED)
- This is Description 1 in Celerant
- UPC Code
- If this is a parent item, you do not have to enter anything here
- You can click the Auto-Generate UPC check box to automatically create a UPC for the item
- You can also manually enter in a UPC here
- Size
- This is where you will select the size of a Child Item
NOTE: ONLY SELECT SIZE IF YOU ARE CREATING A CHILD STYLE
PARENT STYLE/ITEM DO NOT NEED ATTRIBUTES
- This is where you will select the size of a Child Item
- Run
- This will be the second size attribute
- Used for pant sizes, etc.
NOTE: ONLY SELECT RUN IF YOU ARE CREATING A CHILD STYLE
PARENT STYLE/ITEM DO NOT NEED ATTRIBUTES
- Vendor Color
- Enter in the desired color attribute here
NOTE: ONLY SELECT VENDOR COLOR IF YOU ARE CREATING A CHILD STYLE
PARENT STYLE/ITEM DO NOT NEED ATTRIBUTES
Vendor Color should have NO SPACES
Replace spaces with UNDERSCORE ( _ )
Ex) Heather Green = HTR_GREEN, Smokey Grey = SMOKEY_GREY
- Enter in the desired color attribute here
- Vendor Color Code
- Enter in the desired vendor color code here
NOTE: ONLY SELECT VENDOR COLOR CODE IF YOU ARE CREATING A CHILD STYLE
PARENT STYLE/ITEM DO NOT NEED ATTRIBUTES
- Ex) Color: Cherry Noir
- Vendor Color Code: CNR
- Ex) Color: Cherry Noir
- Enter in the desired vendor color code here
- Brand (REQUIRED)
- You will select the brand that is associated with the item here
- Unit Type (REQUIRED)
- Determine if the item will be scanned and inventory as individual items (EACH) or by weight (WEIGHT)
- Once you select either EACH or WEIGHT; Primary Stock Unit, Primary Purchase Unit, Primary Sale Unit, and Consumption Unit will fill in automatically
Purchasing/Inventory
- Located toward the bottom of the screen, you will find a ribbon with options on it, this is the first option

- Purchase Price
- This is where you will enter the Cost of the Item
NOTE: ONLY SELECT PURCHASE PRICE IF YOU ARE CREATING A CHILD STYLE
PARENT STYLE/ITEM DO NOT NEED COST OR RETAIL
- This is where you will enter the Cost of the Item
- Use Bins = Unchecked (Blank)
- Track Landed Cost = Checked (Check mark in box)
- Auto-Calculate Lead Time = Unchecked (Blank)
- Auto-Calculate Reorder Point = Unchecked (Blank)
- Auto-Calculate Preferred Stock Level = Unchecked (Blank)
- Reorder multiple - Used for NSPB
- Enter quantity of pack size that the vendor requires when ordering
- Example: Snoozies must be ordered in quantities of 6
- Enter quantity of pack size that the vendor requires when ordering
- MOQ - Minimum Order Quantity - Used for NSPB
- If item has a minimum to order from Vendor
- Example: Champion brand shirts require a minimum of 48 per style
- If item has a minimum to order from Vendor
- Purchased Lead Time - Manual - Used for NSPB
- This is the time from when the order is sent out to when the items reach the Support Facility
- Vendor (REQUIRED)
- Enter your Vendor associated with the item here
- You will need to check the box for Preferred vendor (shown below)
- Purchase Price

Merchandise Hierarchy
- Choose the hierarchy path that the item will be in (REQUIRED)
- Ex) Graphics / Tshirts / Tees
- Select Included in Version (See Below)
- Choose the hierarchy path that the item will be in (REQUIRED)

Sales / Pricing
- Located toward the bottom of the screen, you will find a ribbon with options on it, this is the fourth option
- At the very bottom of the screen, you will find a matrix to enter your Retail Pricing in
- Selling Price (Base Price)
- Enter your Retail Price here
- First Price, Suggested Price should also be field in as well
- Online Price
PARENT STYLE/ITEM DO NOT NEED COST OR RETAIL
NOTE: ONLY ENTER IN SELLING PRICE, FIRST PRICE, SUGGESTED PRICE IF YOU ARE CREATING A CHILD STYLE
- Selling Price (Base Price)
Accounting
- Located toward the bottom of the screen, you will find a ribbon with options on it, this is the fifth option
- *Income Account (REQUIRED)
- 4101 OWNED SALES
- *COGS Account (REQUIRED)
- 1610 CRT COGS – MERCHADISE
- *Asset Account (REQUIRED)
- Select one of the three options
- 1310 PURCHASES – MERCHANDISE
- For most items
- 1330 PURCHASES – GROCERIES
- This will be for Grocery Items
- 1340 PURCHASES – CANDY
- This will be for Candy Items
- *Tax Schedule (REQUIRED)
- Select either Non-Taxable
- 1310 PURCHASES – MERCHANDISE
- Select one of the three options
Custom
- Located toward the bottom of the screen, you will find a ribbon with options on it, this is the ninth option
- This is where most of your other information will go
- Avatax Tax Code (REQUIRED)
- Description 2
- Buyer – OF2
- Gender – OF3
- Order Cycle – OF4
- Technical Features – OF8
- Special Season – OF9
- Misc – OF10
- This is now Collections – OF10 in Celerant
- Origin – OF11
- Web Pricing – OF15
- Vendor Description – OF19
- Vendor Code – OF20
- Ticket Printer (REQUIRED)
- You will select the printer for tags
- A = Miscellaneous Sticker Tags
- B = Hard Tag (Hang Tag)
- Season – OF1 (REQUIRED)
- Vendor Style (REQUIRED)
- Copy the Item Name/Number here
- Note: Use the Parent style here if this is a Child Style
- Copy the Item Name/Number here
- MH DEPT
- Note: You will not have to enter anything here if you selected the Merchadise Hierarchy
- Type in Department
- Fashion1, Merc1, Graphics, ODHG, etc
- MH TYP
- Note: You will not have to enter anything here if you selected the Merchadise Hierarchy
- Enter in Sub-department
- Ex) Graphics >> Collegiate
- Collegiate is the Sub-department
- Ex) Graphics >> Collegiate
- MH SUBTYP_1
- Note: You will not have to enter anything here if you selected the Merchadise Hierarchy
- Enter in Category of Sub-department
- Ex) Graphics >> Collegiate >> Clothing
- Clothing is the SUBTYP_1
- Ex) Graphics >> Collegiate >> Clothing
- Include / Exclude From NSPB
- Select Include if this is an item that will be bought again
- Select Exclude if this is an item that is a ONE TIME / ONE OFF purchase
- Located toward the bottom of the screen, you will find a ribbon with options on it, this is the ninth option
You have now entered in all of the necessary information for the item, click Save, located at the top or bottom of the page
You can now click Edit and change any information that you need to from the item screen
Creating a Child Style from Parent Style
- You can create Child Styles/Items using the Actions drop down menu and selecting Make Copy
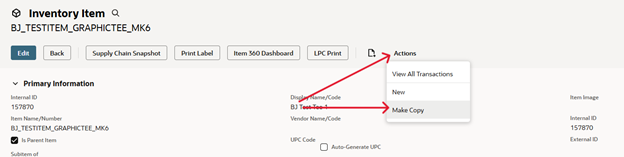
- There are some fields that will need to be re-entered when making a copy
- Ex) Item Name/Number and Display Name/Code
- You will need to change the Item Name/Number to have the attributes you wish to have associated with the item
- Ex) BJ_TESTITEM_GRAPHICTEE_MK6-GREY-S
MAKE SURE TO USE – (DASH) WHEN DENOTING THE COLOR AND SIZE OF THE ITEM IN THE ITEM NAME
- Ex) BJ_TESTITEM_GRAPHICTEE_MK6-GREY-S
- Make sure that Is Parent Item is not checked
- Subitem of
- Select the Parent Item that you wish to associate with this new Child Style
- Select Size
- If needed
- Enter in Vendor Color
- If needed
- Purchasing/Inventory
- Located toward the bottom of the screen, you will find a ribbon with options on it, this is the first option
- Purchase Price
- This will be the cost of the item
- Sales / Pricing
- Located toward the bottom of the screen, you will find a ribbon with options on it, this is the fourth option
- Price Levels
- Located at the very bottom of the screen
- Selling Price (Base Price)
- First Price
- Suggested Price
- Online Price
- Will fill in automatically when Selling Price is entered
You now can Save this new Child Item and repeat the process again to make another Child Style
You should not need to deselect Parent Item now
The item should already have Subitem of, filled in as well
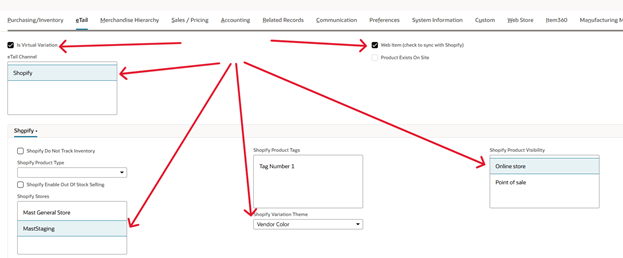
Marking Items Prepare for Web (Sell on Shopify)
- eTail – located at the bottom of item creation screen on the menu ribbon next to Purchasing/Inventory
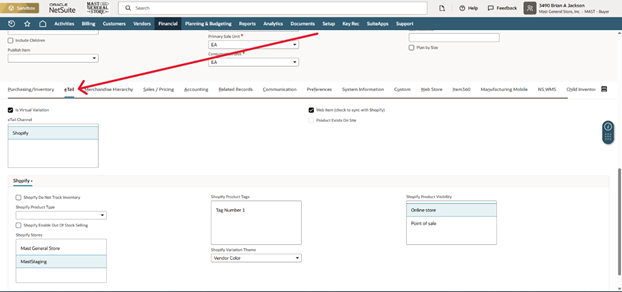
- Web Item (check to sync with Shopify)
- (See image below for reference)
- You will need to check this for the item to be pushed over to MSOL
- Is Virtual Variation (See image below for reference)
- This will need to be checked (True) if the item has attributes and is a parent/child item
- If Virtual Variation is checked(True)
- You will need to select your attributes from Shopify Variation Theme
- Size
- Size + Run
- Size + Vendor Color
- Size + Vendor Color + Run
- Vendor Color + Run
- You will need to select your attributes from Shopify Variation Theme
- eTail Channel
- Select Shopify (See image below for reference)
- Shopify Stores
- MastStaging (In Sandbox mode) – Select this one
- Mast General Store (Live Production) – Select this one (See image below for reference)
- Shopify Product Visibility
- Select Online Store (See image below for reference)