Purchase Order - Manual Creation
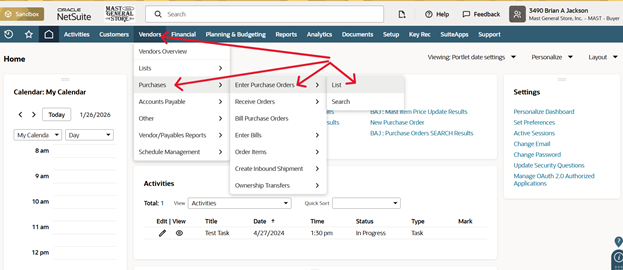
- First go to Vendors, located on the ribbon at the top of your Dashboard
- Go to Purchases>>Enter Purchase Orders>>List
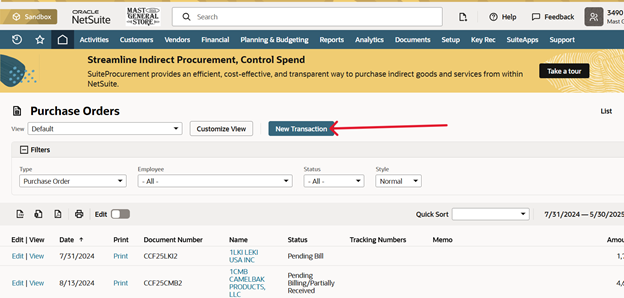
- You will now be on the Purchase Order Page
- Click New Transaction
- You are now in the new Purchase Order screen
- Primary Information
- Form
- Allows you to pick between 3 styles of Purchase Orders
- Allocated
- Consolidated
- Drop Ship
- Allows you to pick between 3 styles of Purchase Orders
- Vendor
- Choose your vendor that the purchase order is for
- Ex) Pressbox, Blue Ridge Knives, Patagonia
- This is Required
- When you select the vendor it will populate the Relationships tab, located at the bottom of the screen with the Rep and email the PO will be sent to.
- Choose your vendor that the purchase order is for
- PO#
- Enter your PO (Purchase Order) number here
- Use the standard format
- Intials / Ship Date / Vendor Code
- Ex) BJ203PBR
- Intials / Ship Date / Vendor Code
- Use the standard format
- Enter your PO (Purchase Order) number here
- Terms
- Here you can set terms for the individual Purchase Order
- Receive By
- This will be when the PO is received into the system
- This should be left blank
- This will be when the PO is received into the system
- Ship Date
- Enter your Shipping date for the order here
- Cancel Date
- Enter your Cancel Date (Refuse Date) here
- Buyer
- Enter your name here
- Form
- Segmentation

- Location
- Enter the location where the order will be shipped to
- Enter 201-SF for the Support Facility
- Enter 203-CPC for the Candy Processing Facility
- Enter 302-CRS
- This is Required
- This is the Pre-Distro section in Celrant
- Enter the location where the order will be shipped to
- Brand
- Enter the Brand for the items you wish to add to the PO
- This is not required
- Location
- Items
- Located at the bottom of the page on the far left of the ribbon
- This is where you will enter your items you wish to add to the PO
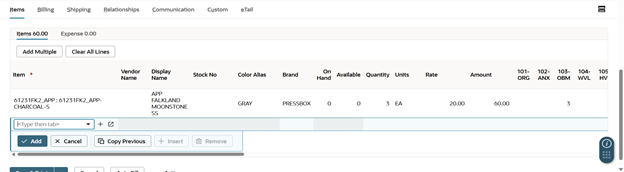
- Select the item from the list
- Click Add
- Enter the required quantity at the location you wish the item to go
- You can change the cost of the item here as well
- This is done under the Rate column
- Once you have all the items and quantities entered you are done with the Purchase Order
- Click Save & Print
- The drop-down arrow next to the Save button has multiple features
- Save
- Save & Email
- This will email the PO directly to the first email associated with the vendor you selected. It will only email what the PO would be as a PDF, nothing else
- Save & New
- The drop-down arrow next to the Save button has multiple features